Last Updated on August 14, 2025
Nebo Flashlight Disassembly: A Step-by-Step Guide to Fix or Maintain Your Flashlight
If you’re looking for a reliable, long-lasting lighting solution, Nebo flashlights are a top choice. With powerful illumination, sturdy construction, and multi-functional modes, they’re perfect for outdoor adventures, emergency preparedness, military operations, or daily household use. However, like any electronic device, flashlights can encounter issues or require internal maintenance. This is where Nebo Flashlight Disassembly comes in handy.
Whether you’re replacing a dead battery, fixing a broken switch, or doing a thorough internal inspection, learning how to disassemble your Nebo flashlight properly will save time, money, and frustration. In this guide, we’ll show you how to disassemble popular models like the Nebo Slyde and Redline step by step, along with important tips, troubleshooting advice, and insights into Nebo’s performance specs and warranty.
???? Related reading: If you’re also considering other tactical lighting options, check out our detailed guide on best SureFire flashlight models.
Why You Might Need to Disassemble a Nebo Flashlight
There are several reasons why disassembling a Nebo flashlight becomes necessary:
- Battery replacement after extended use
- Switch or LED issues
- Malfunctions due to moisture or impact
- Cleaning and routine maintenance
- Customization or upgrades
While Nebo flashlights are known for their robust quality, no product is entirely immune to wear and tear. Understanding how to take them apart properly ensures you don’t accidentally cause further damage during the repair process.
Tools You’ll Need for Disassembly
Before starting the disassembly, gather the following tools:
- Tactical pen or needle-nose pliers
- Soft cloth or rubber grip
- Replacement parts (if needed)
- Clean workspace with good lighting
Now let’s dive into the Nebo flashlight disassembly process for the Slyde and Redline models.
Step-by-Step Nebo Flashlight Disassembly (Slyde & Redline Models)
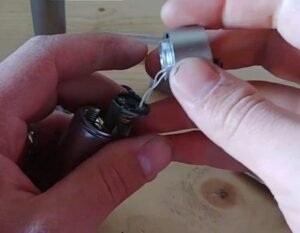
???? 1. Remove the Tail Cap and Spring
To begin, hold your flashlight securely and rotate the tail cap counterclockwise. This step removes the battery compartment cover.
You’ll find two small holes on either side of the spring inside the tail cap. Insert a tactical pen or similar tool into one of the holes and twist it counterclockwise to release the spring mechanism. Turn the cap upside down to help the spring fall out easily.
???? If you’re using your flashlight for self-defense or emergency kits, consider reading our article on ThruNite TN12 Pro Tactical Flashlight for comparison.
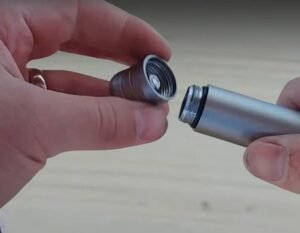
???? 2. Take Out the Pinhead
Located at the center of the tail cap, the pinhead is a small but crucial component that controls electrical connection. If your flashlight is malfunctioning, a worn-out or misaligned pinhead could be the reason.
Use a tactical pen to gently remove the pinhead. It should pop out with minimal force.
If the pinhead is damaged or corroded, replace it with a matching model from a verified retailer. Be sure to check compatibility with your specific flashlight version before purchase.
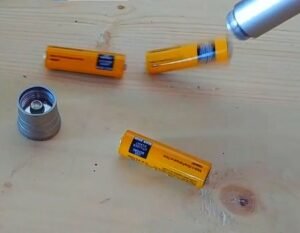
???? 3. Remove the Batteries
Once the spring and tail cap are out, tilt the flashlight upside down to let the batteries slide out naturally. In some cases, a battery may be lodged tightly due to swelling or debris. Use a rubber grip or gently tap the flashlight on a soft surface to loosen it.
???? If battery replacement is your only goal, now is the best time to insert fresh, compatible batteries and test the flashlight before proceeding further.
???? Want a rechargeable alternative? Discover the Fenix UC35 V2.0 flashlight for impressive battery life and high lumen output.
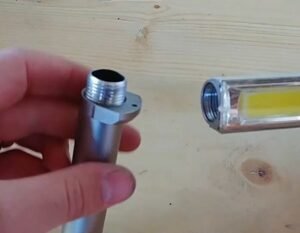
???? 4. Remove the Flashlight Head
To access internal circuits, switches, or the LED module, you’ll need to remove the head of the flashlight. Grip the head securely and turn it counterclockwise. With gentle pressure, it will come off, revealing the switch mechanism and bulb.
Now, examine the condition of the switch and LED. If the bulb is dim or flickering, or if the switch feels loose, it’s time to replace these parts. Always use manufacturer-approved components for replacements.
Performance and Power: How Bright Is a Nebo Flashlight?
One of the key reasons users love Nebo flashlights is their impressive brightness across various models. From compact lights to ultra-powerful tactical options, Nebo has a range of flashlights suited to all kinds of environments.
???? How Many Lumens Does a Nebo Flashlight Have?
The brightness of a flashlight is measured in lumens — and Nebo has options for every need.
- Nebo Redline: Offers up to 1400 lumens, making it suitable for outdoor night navigation, automotive work, or self-defense.
- Nebo Slyde: A multifunctional option with 400 lumens, perfect for home use, camping, or emergencies.
- Nebo 12K LED Flashlight: This powerhouse produces a jaw-dropping 12,000 lumens, ideal for professionals in military, tactical, or search-and-rescue operations.
✅ Want more ultra-bright options? You might like our guide on the Fenix TK16 V2.0 flashlight — another high-lumen tactical beast.
So whether you’re searching through dense woods, fixing a flat tire at night, or navigating through a power outage, there’s a Nebo flashlight with the lumen rating to match.
Lighting Modes of the Nebo Flashlight: Flexible for Any Situation
Modern flashlights are more than just on/off devices. Nebo models come with multiple modes to help users adapt to various lighting needs.
???? How Many Modes Does a Nebo Flashlight Have?
Many Nebo flashlights offer up to five lighting modes:
- High – Maximum brightness for clear visibility
- Medium – Conserves power while still offering decent light
- Low – Ideal for close-range work
- Strobe – Great for signaling or disorienting threats
- Turbo – A temporary blast of maximum power
These modes can be toggled using the tail or side switch, depending on the model. For example, the Nebo 1000 lumens flashlight features all five modes and is a favorite among outdoor enthusiasts and emergency responders.
???? Looking for a flashlight with even more tactical features? Check out the Klarus XT11GT Pro — powerful, rugged, and battle-ready.
Battery Life and Runtime of Nebo Flashlights
⏳ How Long Does a Nebo Flashlight Last?
Battery life can make or break your experience during extended use. Fortunately, Nebo flashlights are built to last — especially when used on the right mode.
- Nebo 12K: Up to 12 hours of runtime on low mode
- Nebo Redline: Offers a few hours of intense brightness on high, with longer use on lower modes
- Nebo Slyde: As a multi-functional light, it gives balanced performance, offering several hours on a single charge
Battery life can vary based on usage, but rechargeable Nebo flashlights are equipped with USB charging ports, allowing you to recharge with ease from power banks, wall plugs, or car outlets.
???? Did You Know? Rechargeable lights like the Fenix UC35 V2.0 are gaining popularity due to their eco-friendliness and convenience.
Durability and Warranty: Is Nebo Built to Last?
One of the reasons people invest in Nebo tactical flashlights is the brand’s reputation for durability. Many models are made from aircraft-grade aluminum and come with water-resistant or waterproof ratings.
But what happens when something goes wrong?
???? Does the Nebo Flashlight Come with a Warranty?
Yes. All Nebo products include a 2-year limited warranty. This covers:
- Manufacturing defects
- Non-user-induced damages
- Battery or LED issues under normal use
However, user-caused damage like improper disassembly, battery leaks, or water infiltration due to incorrect use might void the warranty.
For valid warranty claims, users can contact Nebo’s support team or return the flashlight to an authorized reseller with proof of purchase.
???? Tip: If you’re planning to disassemble your flashlight, ensure you do so carefully to avoid voiding your warranty. Always follow a safe and clean disassembly process.
Nebo Flashlight Models at a Glance
Here’s a quick breakdown of popular Nebo models for comparison:
| Model | Lumens | Modes | Power Source | Ideal For |
|---|---|---|---|---|
| Nebo Redline | 1400 | 4–5 Modes | Rechargeable Battery | Tactical, Hunting, Outdoor |
| Nebo Slyde | 400 | Work Light + Flashlight | AA Batteries | DIY, Home, Emergency |
| Nebo 12K | 12,000 | 5 Modes + Turbo | Rechargeable via USB-C | Military, Rescue, Search Ops |
???? Need to compare more models? Visit our full breakdown of best tactical flashlight brands for deeper insight.
???? Troubleshooting Common Issues with Nebo Flashlights
Even though Nebo flashlights are designed for durability and performance, you might encounter problems like flickering lights, stuck buttons, or complete power failure. Before jumping to conclusions, a careful disassembly and inspection can often reveal — and fix — the issue.
Here are some of the most common flashlight problems and how to troubleshoot them using the Nebo flashlight disassembly method.
⚠️ 1. Flickering or Dim Light
Possible causes:
- Loose battery contact
- Corroded terminals
- Failing LED or pinhead
Disassembly fix:
- Open the tail cap and check for dirt or corrosion on the spring and terminals.
- Clean with a cotton swab and rubbing alcohol.
- Ensure the pinhead is seated properly or replace it if needed
???? Read more about flickering issues in our detailed article on Nebo flashlight keeps turning off.
⚠️ 2. Flashlight Won’t Turn On
Possible causes:
- Dead battery
- Damaged switch
- Disconnected wiring
Disassembly fix:
- Follow the steps to remove the batteries and test with a new one.
- Unscrew the head to access the switch and inspect for damage or moisture.
- If water entered the housing, leave parts out to dry completely before reassembling.
⚠️ 3. Mode Switch Malfunctioning
Possible causes:
- Sticky or jammed mode switch
- Internal mechanical failure
- Firmware/software glitch (for advanced digital models)
Disassembly fix:
- Disassemble the head and gently remove the mode switch.
- Clean any dirt or residue.
- If the issue persists, contact Nebo support or replace the switch.
???? Tip: Not all switches are user-replaceable. For smart models, professional repair may be needed.
???? When to Fully Disassemble vs. Partially Disassemble
Disassembly depends on what part of your Nebo flashlight is faulty. Here’s a quick reference guide:
| Issue | Disassembly Type | What to Access |
|---|---|---|
| Battery not charging | Tail cap + spring | Battery terminal, spring |
| Flickering or dim beam | Tail cap + head | Pinhead, LED, contacts |
| Switch stuck | Full disassembly | Switch panel, wiring |
| Moisture inside housing | Full disassembly | Drying, resealing |
| LED not working | Head only | LED and circuit |
???? Cleaning and Maintaining Your Nebo Flashlight
Disassembly isn’t just for repairs — it’s also important for maintenance. Dust, water, and oil from hands can build up over time, causing performance issues. Cleaning your flashlight once every few months ensures peak performance.
✨ How to Clean Your Nebo Flashlight Internally
- Disassemble the flashlight using the safe steps from Part 1.
- Use a microfiber cloth or Q-tip dipped in isopropyl alcohol to clean battery contacts, springs, and interior housing.
- Avoid touching LED lenses or circuit boards directly.
- Let the parts air dry before reassembly.
⚠️ Never use water or abrasive materials inside the flashlight, as this can damage sensitive components.
???? Reassembling Your Nebo Flashlight
Once all parts are clean and functional:
- Insert the switch and screw the head clockwise.
- Drop in fresh batteries.
- Place the spring and pinhead back inside the tail cap.
- Screw the tail cap back on tightly.
- Test the flashlight through all lighting modes.
If everything works, congrats — you’ve completed your Nebo flashlight disassembly and reassembly successfully!
???? You might also enjoy our teardown of Klarus XT12GT flashlight, another high-end tactical light.
⚙️ Tools and Accessories to Keep Handy
To keep your Nebo flashlight in top shape and simplify disassembly, consider these accessories:
- Tactical pen (for opening springs and pinheads)
- Rechargeable battery pack
- Cleaning kit for electronics
- Silicone O-rings (to replace worn waterproof seals)
✅ Pro tip: Always store your flashlight in a dry place and remove batteries if not in use for a long time. This prevents corrosion and leakage.
???? Advanced Nebo Flashlight Disassembly (Slyde King, Big Larry, and More)
While the disassembly process is generally consistent across most Nebo flashlight models, some premium or specialized versions have slightly different builds. Let’s look at how to approach disassembly for a few advanced models.
???? Nebo Slyde King Disassembly
The Slyde King is one of Nebo’s best-selling flashlights, combining a powerful spotlight and COB work light in one unit. It features a telescopic sliding body and a USB-rechargeable battery.
???? Disassembly Process:
- Slide the body open to expose the COB work light.
- Unscrew the base (tail cap) counterclockwise to access the battery.
- Remove the battery and unscrew the internal retainer ring (use a rubber grip or tool for leverage).
- For full access, gently twist the head counterclockwise to access the LED and control switch.
- Be cautious when detaching the sliding mechanism — internal springs may be under tension.
???? If you’re into work lights, check out our insights on the best flashlight for mechanics for more rugged options.
???? Nebo Big Larry Disassembly
The Big Larry and Big Larry 2 models feature a penlight-style design with magnetic base and COB work lighting.
???? Disassembly Process:
- Remove the tail cap to access the AAA batteries.
- Use a flat tool to pop out the battery carriage (be gentle).
- Unscrew the head cap to reveal the LED components and control board.
- If you need to reach the magnetic base, remove the rubberized bottom using a flat pry tool.
Due to its slim design, avoid forcing components apart, as it may crack the housing.
???? Replacing Nebo Flashlight Parts
After disassembling your flashlight, you may need to replace parts. Here’s what you should know:
???? Replacing the LED Bulb
- Most Nebo flashlights use integrated LED modules, not traditional bulbs.
- These can’t be replaced with ordinary bulbs and require OEM parts from Nebo.
- You’ll need to remove the head cap and circuit board to replace the LED module.
- If your flashlight is under warranty, do not attempt DIY LED replacement—send it to the manufacturer.
???? Replacing the Switch
If the switch is soft, unresponsive, or stuck:
- Unscrew the head cap.
- Locate the control switch module and disconnect it.
- Replace with a new one of the same model (order from Nebo or authorized suppliers).
- Ensure all wires or contacts are properly connected before reassembly.
???? Replacing the Battery
Most models (especially rechargeable ones like the Nebo 12K or Slyde King) use custom lithium-ion batteries. When replacing:
- Match voltage and size exactly.
- Only use batteries approved by Nebo or listed in the user manual.
- Avoid cheap third-party batteries, which can cause overheating or device failure.
???? For another rechargeable flashlight with long runtime, see our review of the Fenix PD32 V2.0 flashlight.
⚠️ Safety and Warranty Tips During Disassembly
Disassembling your flashlight without proper knowledge or tools can cause permanent damage. Here’s how to stay safe — and protect your warranty.
???? Warranty-Safe Handling Guidelines
- Always use non-metal tools when possible to avoid internal short-circuiting.
- Do not tamper with sealed components marked with warranty void stickers.
- Document your steps if you’re unsure — this can help during reassembly or warranty claim verification.
- Store all removed components in a small tray or container.
✅ Reminder: Nebo offers a 2-year warranty on its flashlights. If you suspect a factory defect, contact customer support before attempting any disassembly.
???? Pro Tips to Avoid Mistakes
- Never insert batteries backward — always follow the +/- polarity.
- Be gentle when pulling wires or unscrewing tight parts — forced twisting can break internal solder points.
- If the flashlight is not turning on after reassembly, double-check the pinhead and battery spring alignment.
???? Final Thoughts on Nebo Flashlight Disassembly
Disassembling a flashlight might seem intimidating at first, but with a step-by-step approach, even beginners can safely open and inspect their Nebo devices. Whether you’re dealing with battery issues, a failing switch, or just want to clean and maintain your flashlight, understanding the Nebo flashlight disassembly process is a valuable skill.
From the compact Nebo Slyde to the powerful 12K LED flashlight, Nebo has built its reputation around innovation and reliability. Knowing how to take these devices apart carefully ensures you can keep them performing at their best for years to come.
And remember — while DIY repairs can save you money, always consider warranty terms and follow safety precautions when working with electronics.
???? Want to learn more about tactical gear? Check out our full tactical flashlight guide for expert recommendations.
Frequently Asked Questions About Nebo Flashlight Disassembly
1. Can I disassemble any Nebo flashlight model the same way?
Not exactly. While many models share common components (tail cap, battery compartment, LED head), some like the Slyde King or Big Larry have unique designs. Always refer to model-specific instructions when available.
2. Do I need special tools to disassemble a Nebo flashlight?
Most tasks can be completed with simple tools like a tactical pen, small screwdriver, or rubber grip pad. However, for internal wiring or switch replacement, a precision screwdriver set may be helpful.
3. Will disassembling my flashlight void the warranty?
Yes — if you damage internal parts or remove factory seals. Nebo provides a 2-year limited warranty, so if the issue is likely a manufacturer defect, contact their support before attempting disassembly.
4. What should I do if my Nebo flashlight won’t turn on after reassembly?
Check the following:
- Batteries are inserted correctly (+/-)
- Spring and pinhead are aligned and seated properly
- The tail cap is fully tightened
- The switch is clicking and engaging internally
If none of these work, re-open the flashlight and carefully inspect each part again.
5. Where can I buy Nebo replacement parts like springs, switches, or LED modules?
Always purchase parts from:
- NeboTools.com
- Authorized Nebo dealers
- Reputable flashlight retailers
Avoid unofficial third-party parts, as they may not be compatible and can damage your device.
✅ Final Summary: Mastering Nebo Flashlight Disassembly
To recap, here’s what you’ve learned in this complete guide on Nebo flashlight disassembly:
- How to safely disassemble popular models like the Nebo Slyde, Redline, and Slyde King
- Step-by-step removal of tail caps, springs, pinheads, batteries, and heads
- Troubleshooting common issues like flickering lights or dead switches
- Cleaning tips to extend your flashlight’s life
- Where and how to safely replace internal components
Mastering the disassembly process helps you not only fix problems but also understand how your flashlight works. This knowledge can help you maintain it better, diagnose issues faster, and avoid unnecessary replacements.
???? Don’t forget to check out our guide on flashlight flood vs throw beam if you’re trying to pick the best beam for your activities.
Thanks for reading! Bookmark this page for future reference, and explore the rest of our site for more flashlight reviews, tutorials, and gear recommendations.
I will never buy a Nebo IP67 flashlight again because of the work light does not work.
I paid too much money for this product not to work.
Thanks for nothing.
No helpful instructions on how to get past the green circular circuit board labeled “JH163” to the doubleAA batteries of the NEBO SEVEN-Z. No instructions on how to use a “Tactical pen (for opening springs and pinheads)“ Will never buy another NEBO product again.