Last Updated on September 10, 2025
Nebo has built a strong reputation for manufacturing high-quality, rechargeable flashlights that are not only rugged and durable but also feature-packed for both casual and professional users. These Nebo flashlights are known for being water-resistant, impact-resistant, and versatile, making them ideal for mechanics, campers, hikers, and emergency responders.
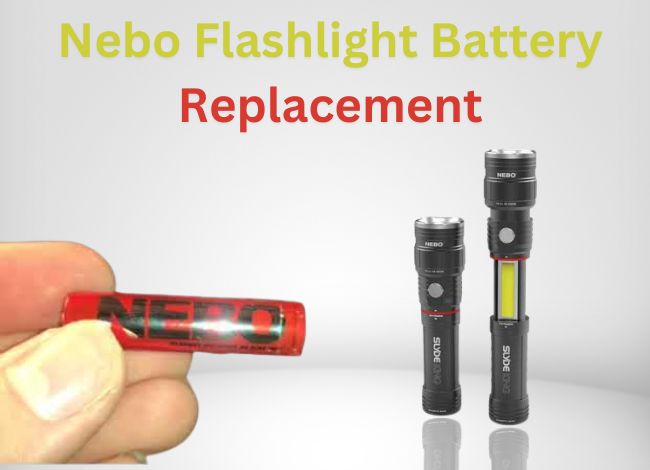
Among Nebo’s lineup, the Nebo Slyde flashlight stands out with a unique sliding mechanism that reveals a hidden work light — a design feature that gives it a competitive edge in multi-functional lighting tools.
In this article, we’ll cover:
- How to operate a Nebo Slyde flashlight
- How to charge it
- How to replace its batteries
- Tips for maintenance and long-term use
What Makes the Nebo Slyde Flashlight Special?
Unlike conventional flashlights, the Nebo Slyde combines two lighting options in one device:
- A powerful front-facing LED flashlight for directional lighting.
- A COB (Chip-on-Board) work light bar that is revealed via a sliding mechanism.
This dual-functionality means you can use it as a focused beam when walking or inspecting something up close, or as a broader work light for illuminating a workspace, especially when both hands are occupied.
The magnetic base lets users stick the flashlight onto metal surfaces (like the hood of a car or a toolbox), which is ideal for hands-free use. It also features multiple light modes, including white, red, and flashing red, to suit different environments and emergencies.
How to Operate the Nebo Slyde Flashlight
Operating the flashlight is easy once you understand the switch functions and sliding mechanism.
Steps to Use:
- Step 1: Hold both ends of the flashlight and gently pull them apart. This reveals the side-mounted COB LED work light bar.
- Step 2: Press the power button once to activate the main flashlight (spotlight mode).
- Step 3: Double-press the button to turn on the work light (floodlight mode).
- Step 4: Continue pressing the button to cycle through the red light and red flashing emergency mode.
These modes are useful in a variety of situations:
- White light: for general use
- Red light: to preserve night vision
- Flashing red: emergency signaling
???? Note: Press the button quickly and consecutively to access different modes.
How to Replace the Batteries in a Nebo Flashlight
While most Nebo flashlights are USB rechargeable, some models still use replaceable batteries. Here’s how to safely change the batteries on a Nebo Slyde model that uses Li-ion cells:
Battery Replacement Instructions:
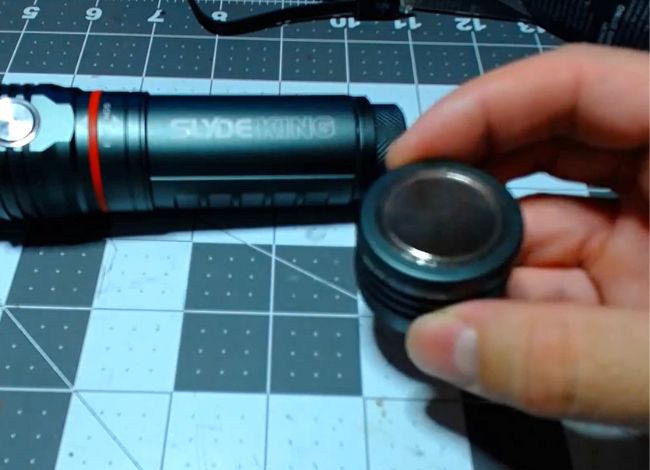
- Detach the Magnetic Base: Start by removing the magnetic base at the tail of the flashlight. This part usually unscrews or pops off depending on the model.
- Unscrew the Rear Metal Cap: Twist counterclockwise to expose the battery compartment.
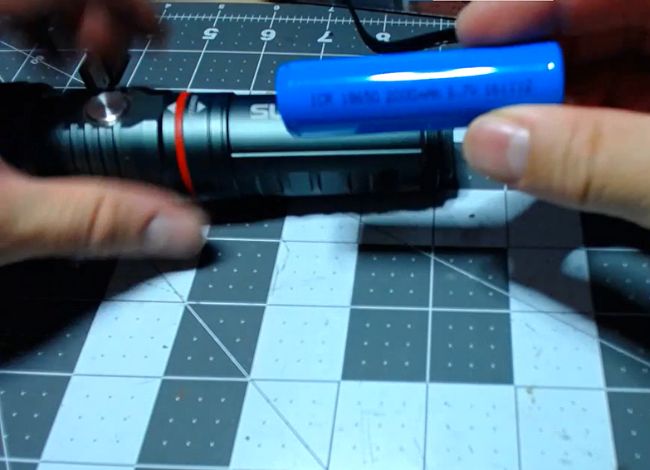
- Remove Old Batteries: Gently tip the flashlight over so the batteries fall out.
- Insert New Batteries: Install four Li-ion rechargeable batteries (usually AAA or proprietary batteries). Be sure to match the positive (+) and negative (−) markings inside.
- Reattach the Cap and Base: Screw the cap back on and reattach the magnetic base securely.
???? Caution: Always use the recommended battery type to avoid damaging internal circuits.
How to Charge a Nebo Slyde Flashlight
Most Nebo Slyde flashlights come with a built-in rechargeable battery and a micro USB or USB-C port.
Steps to Charge:
- Get the USB Cable: Use the USB cable provided in the package. If it’s lost, use a compatible cable that matches your flashlight’s charging port.
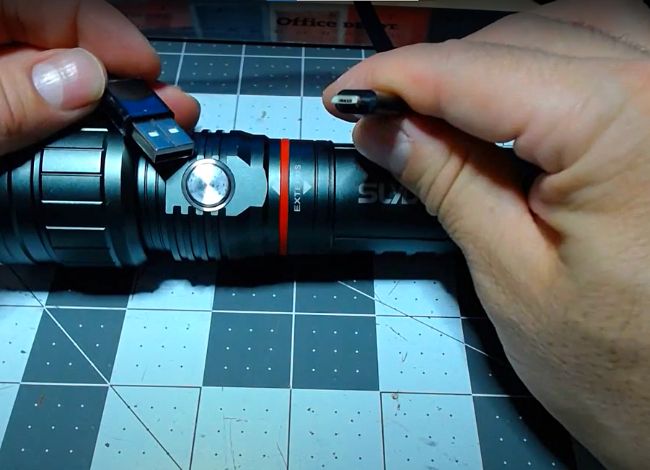
- Open the Charging Port: Look for a silicone seal covering the port—usually on the side or bottom of the flashlight. Open it carefully.
- Connect the USB Cable:
- Plug one end into the flashlight’s charging port.
- Plug the other end into a wall adapter, computer USB port, or power bank.
- Check the Indicator Light:
- A blue light usually means it’s charging.
- Once the light turns off or changes color (depending on model), the flashlight is fully charged.
✅ Pro Tip: Avoid using fast chargers unless specified by Nebo. They might shorten battery lifespan.
How Long Does a Nebo Slyde Flashlight Take to Charge?
The full charging time for most Nebo Slyde flashlights is around 3 to 4 hours, but it can vary depending on:
- The battery capacity
- The remaining charge level
- The power output of your charging adapter
Maintenance Tips to Extend Lifespan
To get the most out of your Nebo flashlight, follow these quick maintenance and care tips:
- Charge regularly: Don’t let the battery completely drain before recharging.
- Keep it clean: Wipe dust and grime off the lens and charging port.
- Avoid water submersion: Even though it’s water-resistant, don’t submerge it unless it’s rated for full waterproof use.
- Use correct power supply: Overcharging or undercharging can shorten battery life.
Frequently Asked Questions (FAQs)
Q: Is the Nebo Slyde flashlight waterproof?
A: Most models are water-resistant (IPX4-rated), which means they can handle splashes and light rain but should not be fully submerged.
Q: Can the flashlight be used while charging?
A: It’s recommended not to use it while charging to avoid internal heat build-up, which could shorten battery life.
Q: What kind of battery does the Nebo Slyde use?
A: Depending on the model, it uses either rechargeable Li-ion batteries or a built-in battery charged via USB.
Q: Can I use the flashlight for camping or hiking?
A: Absolutely! Its durability, multiple light modes, and magnetic hands-free feature make it perfect for outdoor adventures.
Q: Does the flashlight include a zoom or focus feature?
A: While the Nebo Slyde doesn’t offer a zoom lens, the slide-out work light function offers wide-angle illumination.
Conclusion: Why the Nebo Slyde Flashlight Is Worth It
The Nebo Slyde flashlight combines durability, functionality, and innovative design into a compact, rechargeable lighting tool. Its slide motion work light, magnetic base, and multi-mode LED system make it ideal for mechanics, emergency responders, campers, or anyone who needs reliable lighting.
Whether you’re replacing batteries or charging it via USB, the process is simple and user-friendly. With regular care and charging, this flashlight will serve you well in any dark environment.