Last Updated on September 10, 2025
Knowing how to change batteries in Coast flashlight is essential to keeping your light running reliably, especially during critical tasks or outdoor adventures. Coast flashlights are known for their durability and powerful beam, but like any battery-powered device, they require occasional maintenance. Whether you’re using a Coast HP1, G20, or Polysteel model, replacing the batteries properly ensures long-term performance and prevents damage from battery leaks or incorrect installation.
In this guide, we’ll walk you through the easy steps to change batteries in various Coast flashlight models. Plus, we’ll share important safety tips and troubleshooting advice in case your flashlight doesn’t turn on after the battery change. Let’s get started.
How to Change Batteries in Coast Flashlight Easily and Safely
Changing the batteries in your Coast flashlight is a quick and straightforward process. Start by unscrewing the tail cap or head, depending on the model, and remove the old batteries. If you’re unsure how to change batteries in Coast flashlight, always refer to the user manual to avoid damaging the device.
Coast G32 Flashlight Battery Replacement
The Coast G32 flashlight is a compact and water-resistant model ideal for everyday carry, work use, or emergencies. Its LED beam provides a powerful output, but it depends on a reliable battery source to function at peak performance.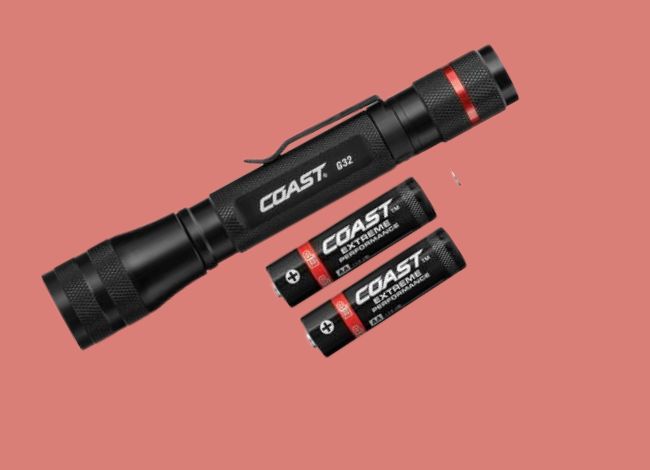
What Type of Battery Does the Coast G32 Use?
The Coast G32 operates using 2 x AA alkaline batteries, which are:
- Easily available and affordable
- Safe for use in high-drain devices
- Known for long shelf life (typically 5–10 years)
- Non-rechargeable but reliable for frequent use
Pro Tip: Always choose branded alkaline batteries like Energizer or Duracell for best results.
How to Replace the AA Batteries in Coast G32:
- Unscrew the Tail Cap
Twist the tail cap counterclockwise to open the battery compartment. - Remove the Old Batteries
Carefully pull out the existing AA batteries. If there’s corrosion or leakage, clean the contacts with a dry cloth or cotton swab. - Insert New AA Batteries
Place two new AA alkaline batteries inside the compartment. Make sure the positive and negative terminals align correctly with the spring and markings inside. - Reattach the Tail Cap
Screw the tail cap back on by turning it clockwise until snug. Avoid over-tightening. - Test the Flashlight
Press the power button to ensure the flashlight works properly with the new batteries.
Replacing Batteries in Coast HP7 Flashlight
The Coast HP7 is a high-performance flashlight offering an adjustable focus beam and strong light output. It’s a favorite for outdoor adventures, tactical use, and security purposes.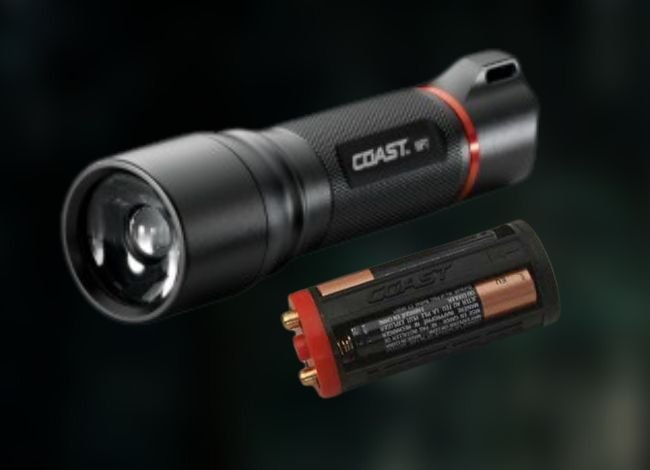
What Type of Battery Does the Coast HP7 Use?
This model uses 4 x AAA alkaline batteries, arranged inside a cartridge holder. These batteries are compact, powerful, and widely available.
Steps to Replace the Batteries in the Coast HP7:
- Remove the Tail Cap
Twist the rear cap counterclockwise to access the battery compartment. - Pull Out the Cartridge
Inside, you’ll find a plastic battery holder containing the four AAA batteries. - Remove and Replace Batteries
Remove the old AAA batteries and insert 4 new AAA alkaline batteries, ensuring the correct polarity. - Reinsert the Cartridge
Slide the loaded cartridge back into the flashlight in the same orientation as before. - Reattach the Tail Cap
Screw the tail cap back on, not too tightly to avoid damaging threads or internal components. - Turn On the Flashlight
Power on the light to test if it’s functioning as expected.
Maintenance Tip: Store the HP7 flashlight with the batteries removed if it won’t be used for long periods. This prevents corrosion.
How to Replace Batteries in the Coast HP550 Flashlight
The Coast HP550 is a powerful flashlight with an intense beam—perfect for heavy-duty tasks, search and rescue, and outdoor applications. Due to its high output, it requires more battery power than smaller models.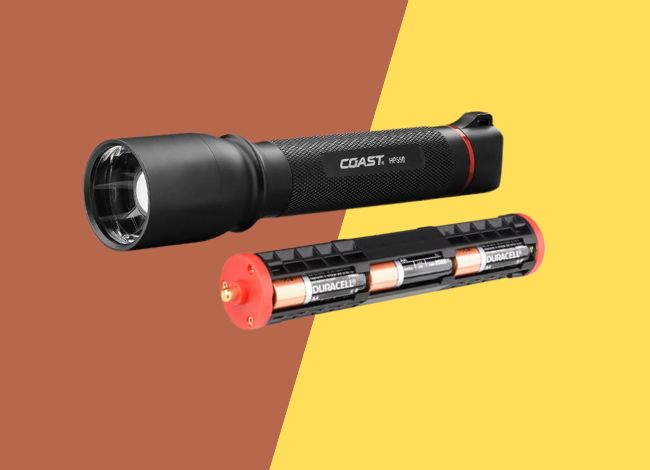
Battery Requirement for HP550:
The HP550 runs on 9 x AA alkaline batteries, which are stored in a large internal cartridge. This setup delivers the juice needed for its high-lumen output.
Steps to Replace HP550 Batteries:
- Remove the Tail Cap
Turn the rear cap counterclockwise to remove it and reveal the battery holder. - Extract the Battery Cartridge
Slide out the battery cartridge which holds 9 AA batteries in a structured format. - Replace with Fresh Batteries
Install 9 new AA alkaline batteries, aligning them correctly with the + and – polarity indicators. - Place the Cartridge Back into the Flashlight
Ensure it’s properly seated for full contact. - Reattach the Tail Cap
Screw the tail cap back on until secure—but avoid overtightening. - Power Test
Turn on the flashlight to verify it’s working correctly.
What If My Coast Flashlight Still Doesn’t Turn On?
If your Coast flashlight doesn’t light up after replacing the batteries, the issue may not be the battery itself. Here are common causes and solutions:
Troubleshooting Checklist:
- Incorrect Polarity: Double-check battery alignment (+/−).
- Dirty Battery Contacts: Clean terminals with a soft brush or dry cloth.
- Damaged Tail Cap or Switch: If the button doesn’t click properly or feels loose, it may need replacement.
- Corroded Cartridge: Especially if old batteries leaked; replace the cartridge if necessary.
- Old or Expired Batteries: Some new-looking batteries may have lost power if stored improperly.
- Faulty Circuitry: Internal components may be damaged due to water ingress or heavy impact.
If none of these steps work, consider reaching out to Coast Products Support for warranty assistance or replacement parts.
Battery Tips for Long-Term Flashlight Use
To extend the life of your Coast flashlight and prevent battery-related issues:
- ✅ Always remove batteries if storing the flashlight long-term
- ✅ Use only recommended battery types (AA or AAA alkaline)
- ✅ Don’t mix old and new batteries
- ✅ Keep spare batteries on hand during trips or emergencies
- ✅ Use a battery tester to check charge levels before disposal
- ✅ Avoid storing flashlights in extreme heat or cold
Final Thoughts
Whether you’re using a Coast G32, HP7, or HP550 flashlight, replacing the batteries is a quick and easy way to restore full brightness and functionality. By following the right steps and using the correct battery types, your flashlight can continue delivering excellent performance for years.
Mastering how to change batteries in Coast flashlight not only saves you time but also helps extend the life of your device. Always follow the manufacturer’s battery recommendations, insert them with the correct polarity, and inspect for corrosion or dirt inside the compartment. With regular care and proper battery replacement, your Coast flashlight will continue to serve you reliably for years to come.
This Coast flashlight battery replacement guide is here to ensure you never get stuck in the dark again. Keep a set of spare batteries ready—and keep your flashlight working at its best.
Frequently Asked Questions (FAQs)
How do I open my Coast flashlight to change the batteries?
To open most Coast flashlights, twist the tail cap (the bottom end of the flashlight) counterclockwise. Once it’s removed, slide out the old batteries and insert new ones following the correct polarity (+/-), then screw the cap back on securely.
What type of batteries does a Coast flashlight use?
Battery type depends on the model. Common Coast flashlights use either AA, AAA, CR123A, or rechargeable lithium-ion batteries. Check the user manual or labeling inside the battery compartment for exact specifications.
Why won’t my Coast flashlight turn on after changing the batteries?
If your flashlight doesn’t turn on, double-check the battery orientation, ensure the batteries are fresh and fully charged, and inspect for any corrosion on the contacts. Also, confirm the tail cap is tightened properly.
Can I use rechargeable batteries in my Coast flashlight?
Yes, many Coast flashlights are compatible with rechargeable batteries, especially if they support lithium-ion types. Always confirm the compatibility in your model’s manual to avoid damage.
How often should I replace the batteries in my Coast flashlight?
Battery life varies based on usage and type. Replace them when you notice dimming or irregular light. For rechargeable models, recharge after each extended use or when the beam weakens significantly.
The flashlight worked well until a battery change was needed. Could not remove the battery cartridge. Followed the video of how to remove the cartridge and was partially successful. Clearly, there is a design flaw to the flashlight. Have you designed a new cartridge to resolve this design flaw ? At this time these flashlights are single use and throw-away as the cartridge cannot be simply removed.